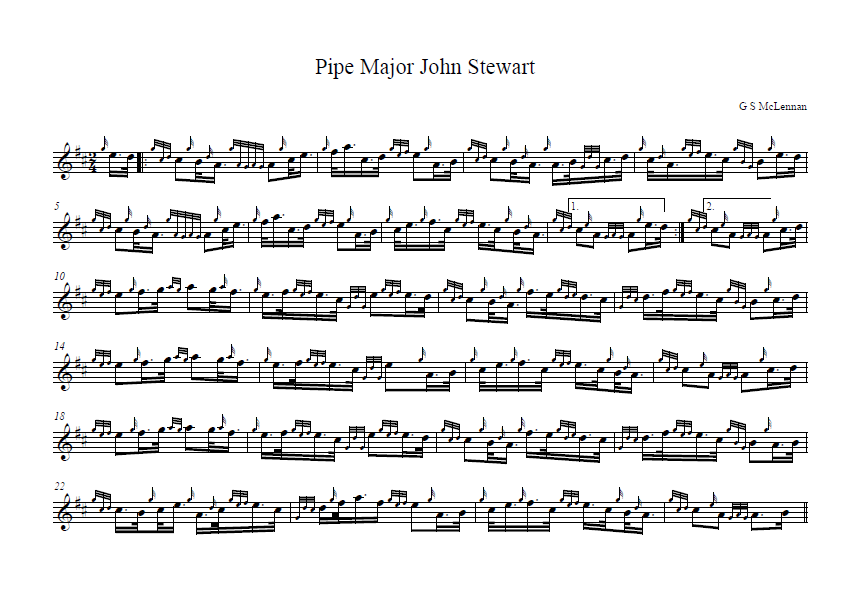
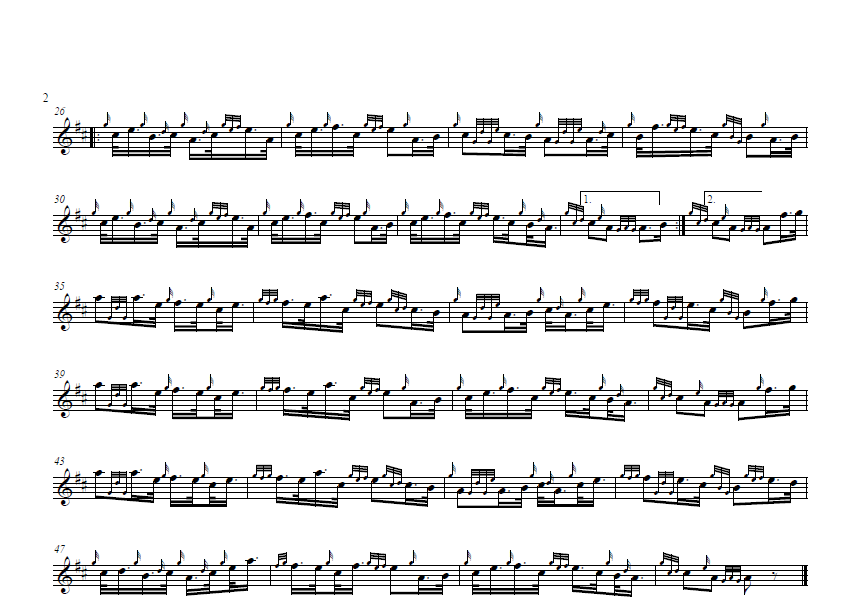
Pipe Major John Stewart Competition march composed by George S. McLennan
Videos to play along with, high and low pitch, at three different speeds, are at the bottom of the page.
It is very important in this tune to
state clearly the purpose and limitations of using midi generated files
to achieve command over a tune. The purpose: 1 To establish a rhythmical
interpretation based on proportions between notes and gracenotes. As
per learning theory described elsewhere on this site, this enables us
to train our fingers and brains in such a way as to guarantee technical
accuracy as close to 100 % of the time as is humanly possible. 2 To understand a full motivic and
rhythmical interpretation of the tune, revealing through this the
semiotic structure (and identifying alternative interpretations that
could be applied) as well as examining how gracenotes contribute to
marking this out and identifying what action we need to take as a
consequence of this information. 3 To help us achieve the technical
foundation from which we can launch a real time live interpretation of
the tune based on the actual physical situation we are in. 4 To identify what variety of
technical solutions we could benefit from applying and help us
generate/identify/select exercises accordingly. 5 The purpose of this website is to
help people 'teach themselves bagpipes'. As such, this technical
foundation is offered, and it is recommended to use this version as a
platform from which to become an original interpreter. 6 This approach highlights to the
teacher/student what the underlying structures are inside a tune and
allows us to explain/understand them in a different way. This
information is particularly potent for piobaireachd, as the level of
contrast and invisible complexity there is greater than light music. The limitations: 1 There is no way to include rubato, or the stretching and squashing of beats, which makes musical interpretation 'live' 2 Emotional responses need technical capacity from the player, but are essentially impossible to programme in a computer 3 This midi approach is ideal for bands, and soloists should treat it with due flexibility. 4 There are other ways to approach learning tunes, perfectly good and effective. This approach should not blind us to those. 5 This should help you establish a
new level and platform, not be a blinker against an open mind. It
should help give you technical confidence to go forth and form your own
opinions as a musician. Notes and learning hints about the tune
The tempo for this tune should be slow and in the area of 40-48 beats per minute.
Part 1 Bar 1 The first High G gracenote is in the
proportion 2:1=D:high G gracenote in order to give adequate emphasis to
the opening doubling The D gracenote in the tachum B:low A is in the proportion 3:1, making the D gracenote very quick and light. The high G gracenote in the birl is
the same length as the first one in the tune. This is best achieved
through practising at quarter speed and feeling all the subbeats
necessary to manage that. The birl fills up the space of a 32nd note. This pattern of 'big' high G gracenotes will be followed throughout the tune. The high G gracenote between low A
and C is a small one in order to allow the melodic notes to carry the
motivic significance here (introductory motif to the next little
phrase). Proportion here is 3:1 Bar 2 Use a small high G gracenote to the E doubling as this is the end of the little phrase and should not be highlighted. High G gracenote from E to low A
should be small to reflect the strategy taken in bar 1 (and later) in
giving the structural meaning to the motif in the melody rather than
putting it into technique. The high G gracenote for the C
doubling is a bigger gracenote in order to mark the beginning of the
bar and mark a move to a motif cba-abc which gives variety and form
creating possibilities here for the tune. The size of the gracenotes in
the next bar will mark this interpretative strategy. Bar 3 The High G gracenote between the crotchet beats is small in order to link this motivic shape. The grip should be fitted into the
time of one half of the preceding B, and the C afterwards should be
given its full length in order to mark the end of the phrase. In solo playing, here should now
ideally feature a moment of rubato, or stretching the time a little to
make the D at the end of the bar function as a dramatic platform to
crash onto the tachum coming next. A big high G gracenote is needed
followed by a tight tachum that leaves as much time on the low A as is
indicated in the music. Bar 4 Make the tachum with a light D gracenote to emphasise the melodic note. Use small High G gracenote for the E doubling and B doubled with a strike (and the strike should be super light as well). The high G gracenote to the E should
be a big gracenote to make the major action of repeating the
introductory phrase, and again a tiny pause should be added to the the
B to mark the end of the phrase; this is best achieved with subtle
rubato rather than through internal gracenote proportioning. Bars 5-6 should follow the
indications above, except for the last two notes of bar 6, which should
be turned into a triplet with the proportion 2:1 = A:B. These should be
preceded with a big high G gracenote as this moment in the tune should
mark out clearly the end of the part and the ending phrase. Bar 7 The high G gracenote from B to the
first C in this bar should also be larger rather than smaller as this
can be used to shift the sense of rhythmical action into 4/8 as opposed
to 2/4, and this in turn gives variety and a semiotic marker that
something is different and important here (the ending bar!). This
semiotic rhythmical signal is allowed in bar 8 to go back to 2/4 to
give closure. All the high G gracenotes in this
bar, as a result of this semiotic need, should be big gracenotes, in
the proportion 2:1 to their preceding notes. In addition to the high G gracenotes
being big, the ECBA motif should be structured such that the EC has the
proportion 2:1 as a triplet in order to give greater power to the
tachum and create a sense of the low A in the tachum ending the motif,
and so getting the last bar ready as a final statement in 2/4. Bar 8 Big gracenotes... The birl has both strikes before the
beat and finishes with the pinky opening low A on the beat. The
proportion for the effect of the low As is 3:1 over the half beat. Part 2 Bar 1 The doublings have the same rhythmical effect as each other and repeat the note in the proportion 1:3 From the final F to the next bar this
should be a big high gracenote in order to give the next beat a sense
of being a whole single motif. Bar 2 All the gracings need to remain light
and small to give the maximum melodic efect, and also to make sure the
big notes are heard clearly. This is also a bar that best sounds
in 4/8, as opposed to 2/4. In this regard the semiotic significance is
that it is bridging or linking to what has come just before the ending
of the first part, showing that this contrast is a 'form creating'
element. The third quaver is introduced with a
big High G gracenote to indicate the next structural thing is
happening, the next meaningful motif and part of the musical
progression. Bar 3 This is divided into 2 motifs - CBA and FED and the remaining C is an introduction to the next phrase. To make this happen, the F doubling should be relatively small and the gracenote between the crotchets big. Bar 4 From the last C of the previous bar all the way to the B doubled with a strike, this is a single motif. Bars 5 and 6 are as 1 and 2 Bars 7 and 8 are as in the first part. Part 2 second time Bars 1-4 as first time Bar 5 The figure CBCE with the two cut
notes in the middle is best formed by making the first 32nd note longer
than the second one, as it then functions like a platform for greater
contrast and drive in the tune. To achieve this the CB should be made
into a triplet with the C being twice as long as the B. This makes the
CE, when played in the written proportion, carry the effect we are
looking for. The C doubling in this interpretation has been opened up a little (easiest to listen and go with the flow). Bar 6 The throw has a medium heavy effect achieved by making the D seem the half the length as the preceding low G. The high G gracenote to F needs to be
as light as you can manage while the High G gracenote going into the E
doubling is heavy, as we need to mark the end of this phrase. A moment of rubato and pause also works here in solo playing. The ending motif/phrase shold be
introduced with a small high G gracenote in order to draw attention to
the first beat in the next bar. Bar 7 and 8 Ending phrase, as above. Part 3 Bar 1 This part opens with a bar in 4/8
again, thus keeping a certain pattern. To make this work it is good to
keep the gracenotes small and compact. The high G gracenote to low A is
half the size of the earlier gracenote. The third eighth note, the E doubling
can be emphasised with a bigger high G gracenote to mark the end of
this little bit of 4/8 action. Bar 2 Keep the gracenotes tight and similar
to the previous bar, but allow the E doubling to open up as the ending
of this 'action'. It is possible in solo playing to add a tiny pause,
or take a mental breather, after the E doubling and give space for a
big high G gracenote to the low A to mark the pick-up to the next
action. The tradition of third parts being a
'working out', variation of first part type moment is visible in this
tune, and so this third bar is a continuation of the 'working out'
process, which might not be expected according to the rules established
earlier concerning repetitions (and it is ths element of being
unexpected that gives the tune its quality). Bar 3 The taorluaths can be open and slow
(taking a third of the available space) in order to make this continued
effect of 'working out'. The end of the bar is worth special
attention, as the A:C should be played in the proprtion 2:1 (triplet)
in order to create a good platform for bouncing sharply and powerfully
off the B at the beginning of the next bar. This also gives a kind of
closure on the taorluath action and indicates the next thing, which is
a kind of return to the earlier 'motion'. Bar 4 Give a good bounce from the B to the F, and after this use the same shape as has been played in every part. Bar 5-6 As bars 1-2 above Bars 7-8 As per endings above. Part 4 This, as can be seen in other great tunes, becomes a summary of the actions and ideas presented earlier on. Bar 1 The grip should take up 1/3 of the
available space in the half beat and this also sets up the rhythmical
shape to do the same in the next beat = FE can be payed in the
proportion 2:1 in order to give the bounce necessary for the cut C that
comes next, thus creating the shape established above. There is an effect of opening up or
broadening of motion that can be achieved here by making the gracenotes
fairly big. The semiotic reason to do so is to show we are getting
towards the end of the tune. Bar 2 Keep the doubling fairly small, but
the E doubling high G gracenote can be a medium size, which continues
to open the sense of space and broadening in the tune, but not too big
as we don't want to emphasise the end of the phrase. Bar 3 This should work like Bar 1 of this
part in rhythmical terms, and by doing on low A what had happened on
High A it is creating a narative of continued working out, but
indicating it is nearing a conclusion. Bar 4 And again...the triplet action to get
the grip into a nicely spaced out proportion contributes to the
structural narrative here. followed by a sudden switch back into the
division by even numbers ryhthmical approach seen earlier (keep the
bigger high G gracenotes though). Bars 5-6 as bars 1-2 above Bars 7-8 as ending bars in the other parts Bars 1-4 of the part 4 repeat, as
above, except for giving a pause before the E doubling (and a big high
G gracenote), which is essential to mark out the absolute coda coming
up. In this interpretation the E and D at
the end of the bar have been given their written length, assuming that
a pause has been used in solo playing. If this is inpractical due to
playing in a group then the triplet approach from above can be used to
emphasise the bounciness of the next bar. Bar 5 Allow the gracenotes to be a little
more open than in the first part of the tune, to indicate the
broadening process which is here to show the ending, and also remember
to use the principle of giving a little more time to the first of two
equal cut notes in order to create a bouncing platform for the second
note. Bar 6 All big gracenotes and 2:1 proportions... Bars 7-8 Use a gradual and tiny slowing down to mark the end of the whole tune, but otherewise keep the proportions was they were above.
Videos to play along with Low pitch normal speed
Low pitch half speed
Low pitch quarter speed
High pitch normal speed
High pitch half speed
High pitch quarter speed
This tune is truly a classic worth
giving lots of thought to. Please enjoy it and consider what your own
interpretation should be and why.